Instruction video : How to use Water Timer

Water Timer

Click the image to view the manual.

Garantie:

Die Garantiezeit für dieses Produkt beträgt ein Jahr ab Kaufdatum. Sollten innerhalb eines Jahres Qualitätsprobleme auftreten, bieten wir einen kostenlosen Garantieservice an.

Warning:

  • Verwenden Sie nur sauberes, kaltes Wasser.
  • Wenn die Temperatur unter 37 °F (3 °C) fällt, gefriert das im Wasserzeitschalter angesammelte Wasser. Dies kann zu Rissen im Gehäuse und Undichtigkeiten führen, wodurch das Produkt unbrauchbar wird. Wenn die Temperatur unter 37 °F (3 °C) fällt, sollte der Wasserzeitschalter werden daher entfernt und im Innenbereich gelagert.
  • Der Filter verhindert das Eindringen von Schmutz und verlängert die Lebensdauer des Wasserzeitgebers. Bitte reinigen Sie den Filter regelmäßig und ersetzen Sie ihn rechtzeitig, wenn er verschlissen ist.
  • Um eine längere Batterielebensdauer zu gewährleisten, verwenden Sie bitte zwei AA-Alkalibatterien (nicht im Lieferumfang enthalten). Verwenden Sie keine alten und neuen Alkalibatterien, Zink-Kohle-Batterien oder wiederaufladbare Batterien zusammen.
  • 01.Funktionsbeschreibung:

    (1) Wassereinlass
    (2) LCD-Bildschirm
    (3) ‘-‘ Button
    (4) ‘+’ Button

    (5) A Water outlet

    (6) DELAY button
    (7) ESC/OFF button
    (8) Set/OK button
    (9) Filter
    (10) A/B Valve Switching Plan Screen
    (11) B Water outlet

    Button Function:

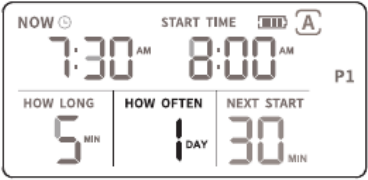
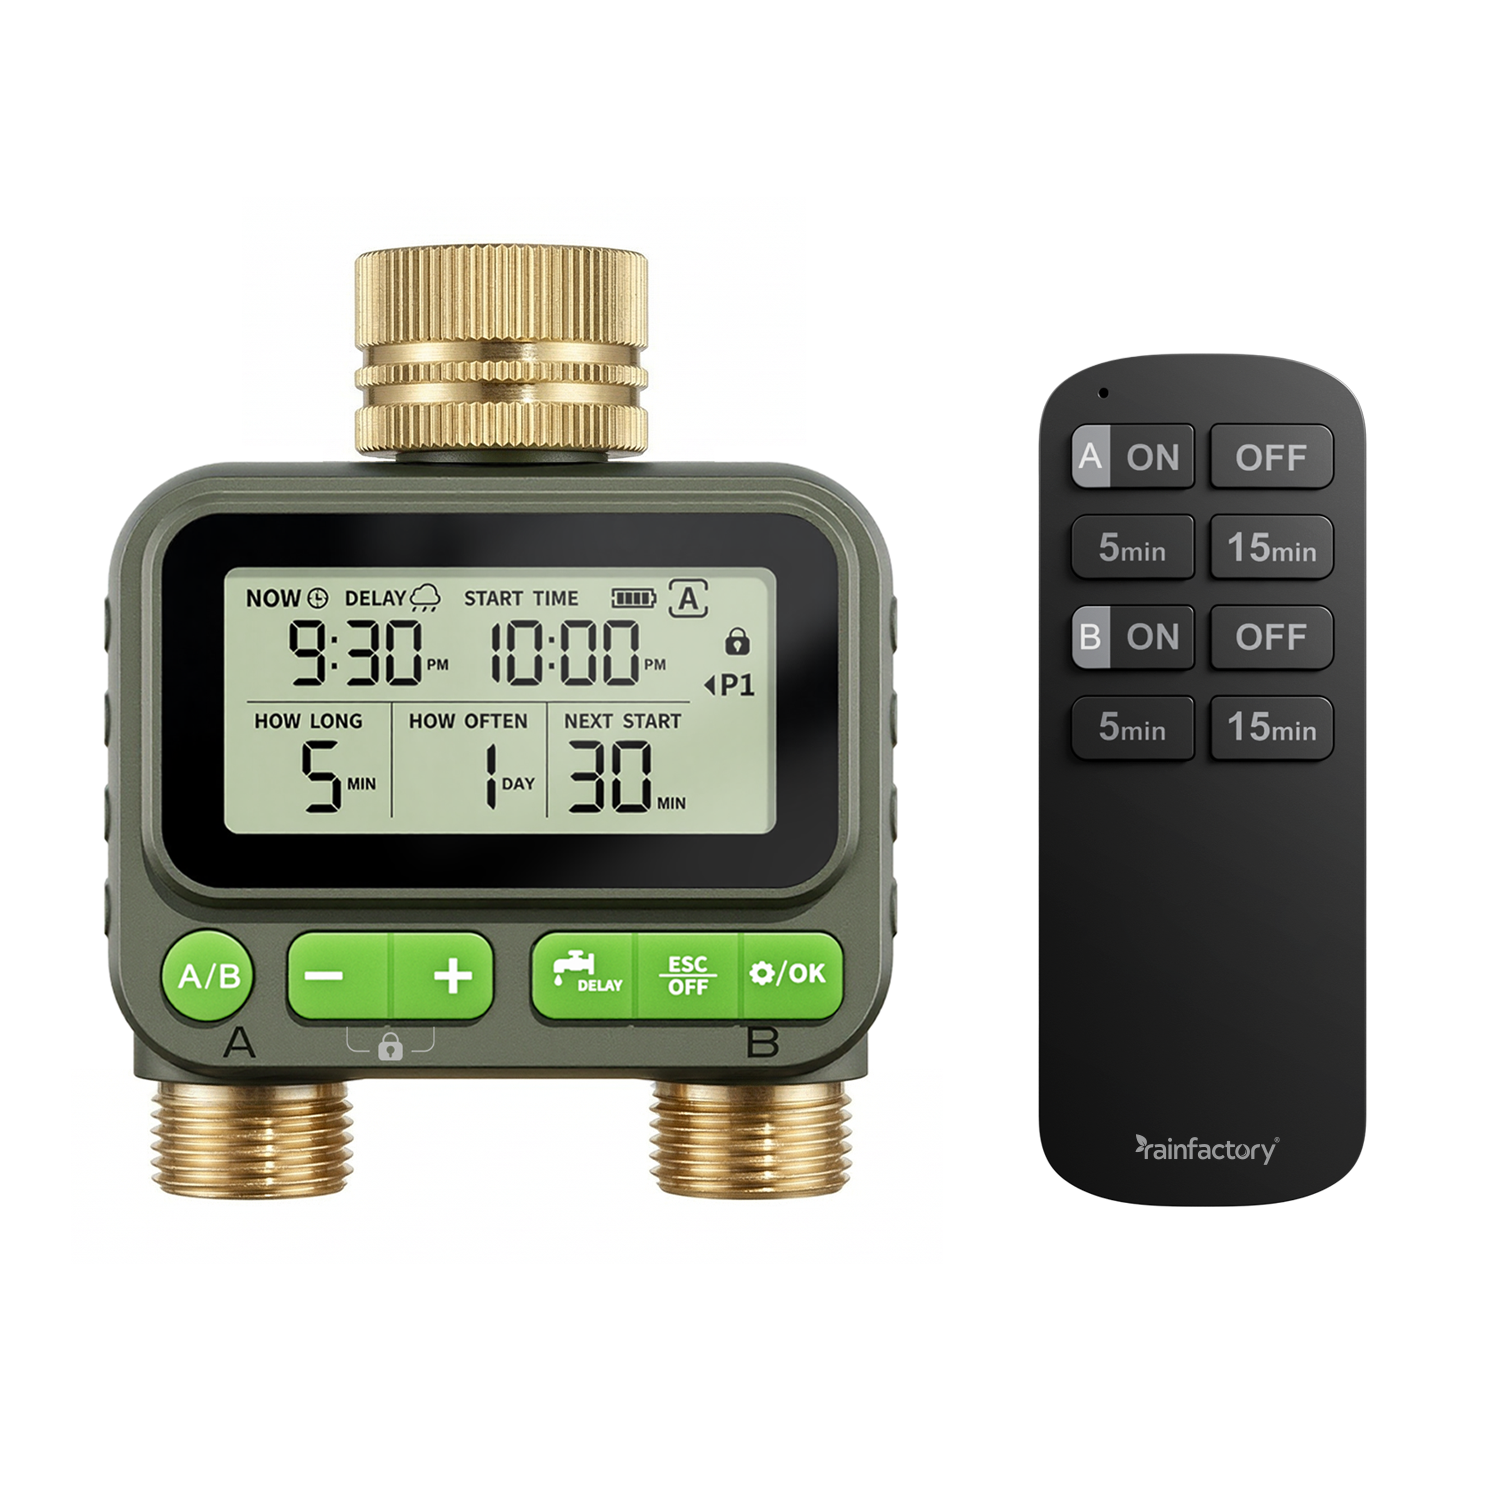
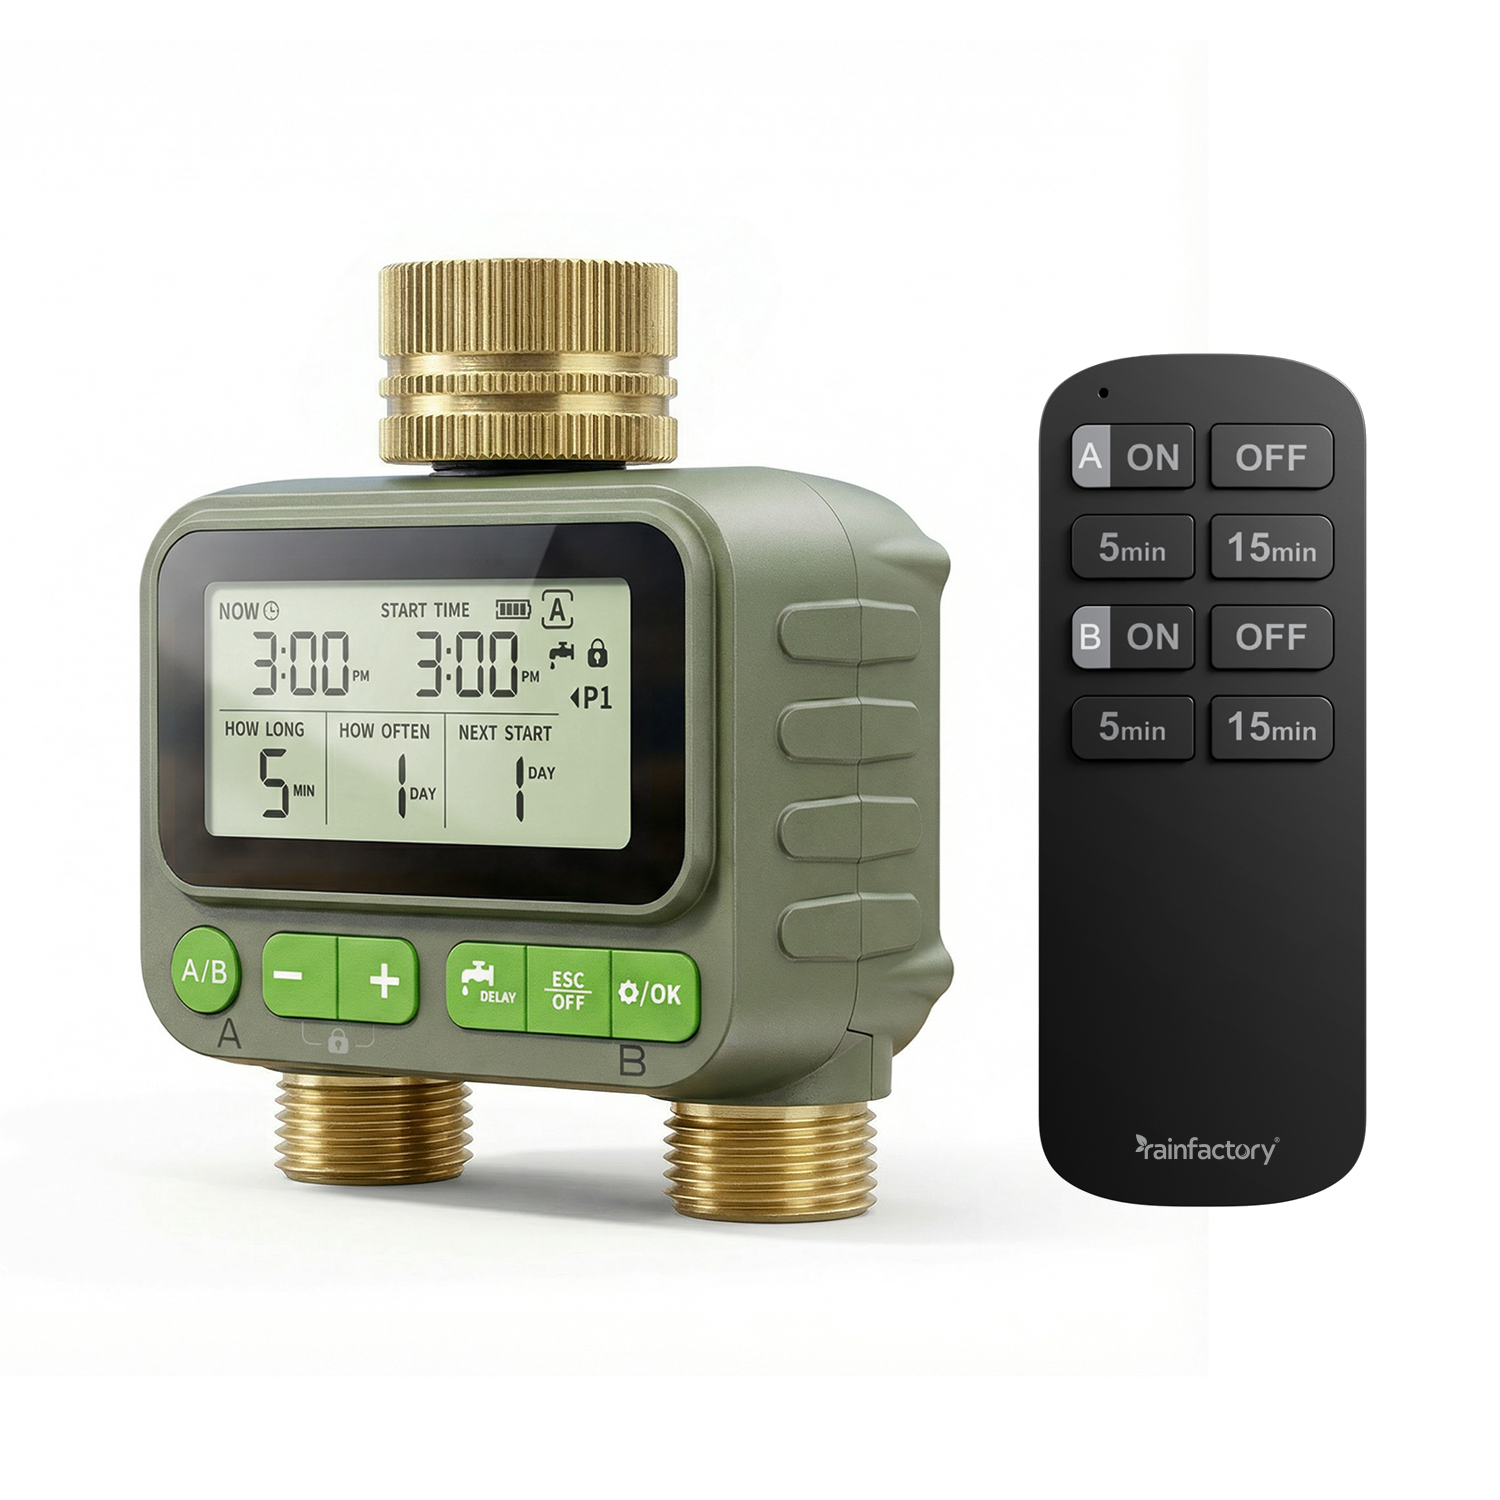
    Short press: Add/subtract time, switch watering plan, switch hour mode.
    Long press: Quickly add or subtract time
    Long press and hold the '+'and'-'buttons at the same time: Child lock mode

    Short press: manual watering setting
    Long press: delayed watering setting

    Short press: Exit settings
    Long press: Exit manual watering, exit delayed watering, turn off

    Short press: Confirm
    Long press: Set the current time

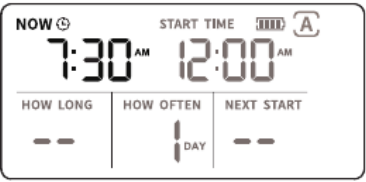
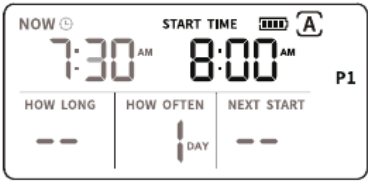
    Short press: A/B Valve Switching Plan Screen

    Technical Parameter:

    Working water pressure
    8-120 PSI (0.5-8 Bar)
    Maximum water flow
    35L/Min (10 Gal/Min)
    Waterproof rating
    IP65
    Working temperature
    3°C-50°C (37.4°F-122°F)
    Watering time options
    1-59 Seconds / 1-59 Minutes / 1-99 Hours
    Watering frequency options
    1-23 Hours / 1-30 Days
    Water inlet size
    NH (US) is used for 3/4" threads,
    BSP (EU) for 3/4" or 1" threads
    Water outlet size
    Used for 3/4" standard pipes
    Battery type
    2 * AA (1.5V) alkaline battery (not included)

    Installation method of Water Timer:

    1

    1. Turn off the faucet and wrap Teflon tape (or PTFE Thread Seal Tape) around the faucet thread.

    2

    2. Twist the water timer onto the faucet and make the monitor as vertical as possible to the ground.

    3

    3. Wrap Teflon tape (or PTFE Thread Seal Tape) around the thread of the water timer outlet.

    4

    4. Twist the water pipe onto the water timer. After setting the water timer, turn on the faucet.

    Watering time setting

    Step 1: Set the current time

    1. Long press the’/ok’ button for 3 seconds to enter the current time setting.
    2. Press the ‘+’ or ‘-‘ button to select the 12H/24H time mode, then press the’/ok’ button to confirm the setting and proceed to the next time setting.
    3. Press the ‘+’ or ‘- button to set the current hour, press the’/ок” button to confirm the setting and proceed to the minute setting.
    4. Press the ‘+’ or ‘-‘ button to set the current minute, and press the’ button to save and exit the settings.

    Step 2: Set watering start time

    1. Press the “A/B” key to switch to the A/B Valve Schedule Interface.
    2. Press the ‘+’ or ‘-‘ button to switch between P1/P2/P3/P4 (Plan 1/Plan 2/Plan 3/Plan 4).
    3. Press the ‘/ок’ button to set the Plan.
    4. Press the ‘+’ or ‘-‘ button to set the first watering time (START TIME), and set the hours and minutes. 5. Press the ‘/ok’ button to save the settings and enter the next

    Step 3: Set watering duration(HOW LONG)

    1. Press the ‘+’ or ‘-‘ button to set the watering duration(HOW LONG).
    2. Setting options: 1-59 seconds/1-59 minutes/1-99 hours.
    3.When the watering duration(HOW LONG) is set to 1 second, pressing the’-‘ button will show a ‘–‘ symbol, and the plan will be canceled.
    4. Press the ‘/ok’ button to save the settings and proceed to the next setting step.

    Step 4: Set watering frequency(HOW OFTEN)

    1. Press the ‘+’ or ‘-‘ button to set the watering duration(HOW LONG).
    2. Setting options: 1-59 seconds/1-59 minutes/1-99 hours.
    3.When the watering duration(HOW LONG) is set to 1 second, pressing the’-‘ button will show a ‘–‘ symbol, and the plan will be canceled.
    4. Press the ‘/ok’ button to save the settings and proceed to the next setting step.
    (Please note that if there is no operation within 20 seconds in all setting steps, the water timer will automatically exit the settings).

    Other functions:

    1. Manual watering

    • Press the DELAY button briefly to enter manual watering settings.
    • The default setting is ‘3 seconds’, Press the ‘+’ or ‘-‘ button to switch between 1-59 seconds/1-59 minutes/1-99 hours.
    • Press the ‘/ок button to confirm the settings, and the manual watering mode will start running. During this time, all scheduled watering plans will be suspended.
    • To cancel manual watering, briefly press the’ DELAY button or press and holdEsCOFF it for 3 seconds to exit manual watering mode.

    2. Delayed watering

    • Press and hold the’button DELAY for 3 seconds to enter the delayed watering setting.
    • The default setting is 24 hours. Press the “+” or “-” button to switch between 1-59
      seconds, 1-59 minutes, or 1-99 hours.
    • Press the ‘/ок’ button to confirm the settings, and the delayed watering will start
      running. During the period, all watering plans will no longer be activated.
    • To cancel delayed watering, press and hold the’
      delayed watering mode.
    (Please note that if there is no operation within 20 seconds in all setting steps, the water timer will automatically exit the settings)

    3.Child lock

    • Press and hold the “+” and “-” buttons simultaneously for 3 seconds to activate the
      child lock. The screen will show the”icon.
    • After entering the child lock mode, the current status of the device will be locked to
      prevent accidental operation.
    • Press and hold the ‘+’ and’-‘ buttons simultaneously for 3 seconds again to exit the
      child lock mode.

    4. Turn off

    • If you want to stop watering for a long time, press and hold the’Esc’ button for 3 OFF
      seconds to enter the ‘OFF’ state.
    • The water timer will stop all watering activities, and the LCD screen will display the
      ‘OFF’ symbol.
    • If you need to activate the automatic watering mode, press and hold the’ ESC’button OFF
      again for 3 seconds to exit the ‘OFF’ state.

    5. Battery status

    Note: When the device is low power, it will remind to replace the battery; When the low battery symbol flashes, the valve will automatically closes and no longer enters watering mode. To avoid water leakage, the battery needs to be replaced before the device can work.

    Troubleshooting

    1. If the water timer does not water according to the settings, the checking method is as follows:
    • Check whether the faucet is turned on.
    • Check whether the time is set correctly.
    • If the start time, duration, and frequency of watering correct.
    • If the delayed watering turned on.
    2. If any leakage in the water pipe connection. The checking method is as follows:
    • If the filter and pipe of the water timer installed correctly.
    •  If the faucet or pipe 3/4 “NH threaded.
    • If the faucet or pipe 3/4 “BSP threaded.
    • Check whether the water pressure is between 8-120 PSI (0.5-8 Bar).
    3. The valve of the water timer cannot be turned on/off. The method to reset the valve is as follows:
    • Install the water timer onto the faucet and turn the faucet to maximum.
    • Activate manual watering mode, the watering time is at least 5 seconds, Repeat at least 5 times until the water can flow out normally.

    Remote Control User Manual

    Important Notice The remote control is not paired with the water timer at the factory. You must pair them before using the irrigation function. You can choose either Automatic or Manual Pairing Mode.

    Automatic Pairing Mode

    Step 1. Power On: Install batteries into the water timer.
    The screen will show a flashing “RC1” icon in the upper-left corner, indicating that automatic pairing mode is active.
    Step 2. Pairing: Within 3 minutes, press any button on the remote control.
    Upon successful pairing, the “RE1” icon will stop flashing.
    Step 3.Exit Pairing Mode: The timer exits pairing mode automatically after successful pairing.
    It will also exit pairing mode if no button is pressed for 3 minutes, or if any button on the timer is pressed.

    Manual Pairing Mode

    Use this mode if automatic pairing fails, or to add a new remote.Use this mode if automatic pairing fails, or to add a new remote.

    Step 1. Activate Manual Pairing Mode: Press and hold the “+” button on the water timer for 10 seconds
    A flashing “AC1” icon will appear, indicating manual pairing mode is active.
    Step 2. Pairing: Within 20 seconds, press any button on the remote control. Upon successful pairing, the icon will stop flashing.
    It will also exit if no button is pressed for 20 seconds, or if any timer button is pressed.

    Step 3. Exit Manual Pairing Mode: The timer exits pairing mode automatically
    after successful pairing.

    Clear All Remote Pairings

    Press and hold the “-” button on the water timer for 10 seconds. The screen
    displays on the top-left, and it exits automatically after clearing.

    Remote Control Functions

    1. Start Irrigation
    Press the “ON” button.
    – The valve opens immediately and watering begins.
    – The system will automatically stop after 24 hours.
    2. Stop Irrigation
    Press the “OFF” button to immediately close the valve and stop all watering.
    3. Timed Irrigation
    Press a preset duration button (e.g., “5min”, “10min”). See your remote for specific labels. The valve opens immediately and will shut off automatically after the selected duration.
    Notes 
    1.The timer always executes the most recent command.
    Examples:
    – Pressing “ON” starts a 24-hour watering cycle.
    – Pressing “5min” next will cancel the 24-hour cycle and start a 5-minute cycle.
    – Pressing “5min” and then “10min” will result in a 10-minute cycle, as the last command takes precedence. 2.Once paired, reinstalling the batteries will not trigger pairing mode again. You must use Manual Pairing Mode to pair the remote again.